
There are a huge number of ways to install the Windows operating system on a computer - using external devices, a backup copy, an optical disk, etc. But among experienced PC users, another method is common by which you can install the system without using a disk or flash drive - an ISO image.
This installation method has a number of advantages:
- There is no need to tediously configure the BIOS environment to start booting your computer from a disk or flash drive;
- Installation occurs without the use of external storage media.
Preparing for installation
For successful installation the following components are required:- Daemon Tools program. The free trial version can be downloaded from the developer’s official website;
- Operating system image created using Daemon Tools;
- EasyBCD utility, whose task is to work with the boot record.
We will not pay attention to this point, but will immediately move on to answering the question of how to install Windows without using external devices.
Setting up the hard drive (HDD)
In this step, a new partition is created on the HDD where the user will store the newly installed operating system.This is done using the integrated Windows software:


A tool for creating a new partition will appear. We follow his instructions and indicate the volume letter (it can be any). After the process is completed, a new disk will appear on the computer, which can be seen through “My Computer”.
Preparing the operating system
Launch the Daemon Tools utility and specify in it the path to the ISO image of the system. We mount this image into a newly created partition on the HDD. The copying procedure takes 15-20 minutes. After completion, we follow the algorithm:

To complete the settings, click Add Entry. Such changes will cause the user-created operating system to load first when the computer starts.
OS installation
We reboot the device, after which the owner is redirected to the system boot manager:
The newly created OS is displayed in the first place; to install Windows 10/7/XP, select it and click enter.
Once the download is complete, the manager displays 3 operating systems to start. EasyBCD will help you get rid of the two extra ones, but you must boot from the OS where the utility is installed:
- Launch the program and go to the “Edit Boot Menu” category;
- Here we check the box for all Windows operating systems that are no longer needed when booting the computer and press the Delete button.
What is different about installing Windows XP?
Installing Windows XP without a disk is a little more difficult than other systems. This is due to the fact that the installation procedure requires a larger number of files. So, in the folder with XP there is no resource that is important for starting the installation - boot.wim, so for such Windows there is another method:
Using the Command Line
The installation method through the user environment is quite simple and the most popular, but there are alternative methods that allow you to install Windows 10 and any other OS.Algorithm for using the console:
- We transfer the archive with the image to the HDD partition, which will not change during the deletion procedure. Run the extension file.exe, which is located in the folder;
- The personal computer will begin to reboot. Press the F8 key, which will open additional methods for starting Windows;
- Select the troubleshooting section;
- After the download is complete, a window with recovery tools appears. Select the command line;
- To start the installation, you need to enter two commands into the console:
- C:>windowssystem32>T:, where T is the letter designation of the disk volume on which the system image is located;
- Enter T:>setup.exe.
Video instruction
The video presents current methods that will allow you to install Windows 7 without a disk or flash drive:
Install the OS from it. If you don’t have this option or want to try out the operating system, you can download a disk image from the official website. This article will tell you how to install Windows 7 yourself and not mess it up.
Most of Windows 7 on the Internet are not licensedWho seeks will always find
To install Windows 7 Ultimate for free from the Internet, you first need to find where to download. There are plenty of safe sites on the Internet. The only thing is that most of these versions are not licensed, and therefore, after 30 days the system will require an activation key. On the Internet you can find a cracked OS that has a built-in tablet and does not require activation.
Maximum opens up wide possibilities for the user. This is a productive and advanced version. It offers additional features, encryption system, multilingual user interface, etc. Take this into account, since some highly specialized programs require the “maximum” edition of the OS.
WATCH THE VIDEO
OS installation methods: flash drive and others
The most common way is to install Windows 7 from a flash drive. This method can be used regardless of whether there is a disk drive or not. So, to reinstall Windows 7 from a flash drive, we create a bootable drive. If you already have it, from friends or acquaintances, then it’s a small matter: restart your computer and wait for the automatic installation of the OS to begin.
If you only have a disk image with installation files and an empty flash drive, you will have to create an installation USB drive. There are many options, but we'll take the simple route. Download one of the programs:
- Ultra ISO
- Windows 7
- WinSetupFromUSB
Transfer the downloaded ISO image to a flash drive. Easier USB/DVD Download Tool. We indicate the location of the image on the PC and click “Next”. After a couple of seconds, the installation flash drive is ready.
Installing Windows 7 from a flash drive via the menu is a simple process. To configure the BIOS you need to know the hot keys to enter this mode. They are different for each computer model. Therefore, first scour the Internet and find the desired combination. After turning on the PC, press the keys and a menu will open in front of you:
- We are looking for the “Startup Settings” section (called Boot – “Boot Device Priority)
- Select the flash drive as the first boot device
- To exit the BIOS press F10
- The computer reboots and automatic installation begins
The problem with this method is that you will then have to go into the BIOS again and change the startup settings back.
We enter the BIOS when starting the computerAnother method is to launch the boot menu. It also requires a special button: Del, Esc, F2, or others. In the dialog box, you immediately change the launch parameters, and the OS installation begins. Moreover, the parameters automatically return to standard. You can install Windows 7 via bios not only using a flash drive, but also an installation disk. We will not consider installing Windows from a disk, since the process is no different from the one described above, only it does not require preliminary configuration of the media. The disc must be inserted and the PC rebooted. If you can’t install Windows 7 on your computer, you need to go back to the BIOS or boot menu and do the same steps.
enter the boot menu - press the buttons: Del, Esc, F2 or others.HDD
Few people know, but you can install Windows 7 from your hard drive. This option is suitable for those who want to install Windows without a disk or flash drive. This method is very simple in that you don’t have to create an installation flash drive or delve into the BIOS. To start the required process we need:
- OS ISO image
- Any program for working with images (Daemon Tools)
- To work with boot record you may need EasyBCD
After you have found an OS image on the Internet, you need to prepare your hard drive. To do this, you need to create a partition for the OS on the hard drive:
After you have found an OS image on the Internet, you need to prepare your hard drive- “Start” – “Computer” (right mouse button) – “Management” (run as administrator)
- "Disk Management"
- Depending on how many drives are on your PC, we will need to work NOT with the system one.
- We don’t touch the system disk, select the second one and right-click “Shrink Volume”.
- We determine the volume we need - 25 GB is enough - “Compress”
- A new disk will appear in the window, but it is not ready yet. Right-click on the new part and select “Create simple volume”
- Here you can give the disk a name, for example, D and click OK. We are waiting for formatting. Ready.
There are also other ways to create a partition on a disk, using third-party programs.
So, when the HDD is ready for work, download the above programs and install them. Using this, you need to unpack the image and transfer the installation files from the virtual disk to the D partition we created.
Using Daemon Tools you need to unpack the image and transfer the installation files from the virtual diskRun EasyBCD as administrator. In the Add New Entry menu, select the WinPE tab and in the Name field name our system (as you like). Below we indicate the path to the boot.wim file, which is located in the sources folder on the disk we created earlier. Click Add Entry. The hard drive is ready for installation.
Network boot
There is a Windows 7 installation over the network. This method is very complex and time consuming. You will need a Windows Automated Installation Kit (AIK) for Windows 7, a distribution kit with Windows 7 and DHCP and TFTP servers. If you don’t understand this, then there is no point in even delving into this topic. It is better to use one of the above methods for installing the OS.
Installation process
If you decide to install Windows 7 from the Internet for free, all you have to do is follow the step-by-step instructions and make sure you enter the data correctly. Regardless of the method you want to use, after turning on the computer, Windows will automatically install:
Installing Windows 7 takes some time, depending on the power of your computer- Choosing a language
- We accept the terms of the license agreement
- Select “Full installation”
- It is recommended to format all drives
- The PC will reboot and continue installation
- Give and set a password
- In the activation window, click “Next”
- "Use recommended settings"
- Setting the date and time
- Searching for your home network
Setting up Windows 7 after installation ends here.
Further work with the operating system
If it doesn’t start on Windows 7, you’ll have to look for the right software. Driver Booster automatically scans your computer and finds recommended driver updates. Programs for installing drivers on Windows 7 are useful if you do not have an installation disk with all the necessary starting materials.
After reinstalling the OS, you need to load drivers for the video card so that the image is correct, drivers for the sound video card, the necessary programs for Windows 7, such as Microsoft Office and a browser.
System errors
Problems may arise during OS installation. One of the main ones is the location from where you are trying to download Windows 7 for free. Initially, the installation files may be incorrect, and therefore problems will arise during installation. A common error is when the necessary drivers are not found when installing Windows 7. This error is due to the presence of two USB 2.0 and 3.0 connectors on modern computers. You can fix this problem by moving the flash drive from one slot to another.
A common error when the necessary drivers are not found when installing Windows 7Users often encounter the problem that Windows 7 cannot be installed on their hard drive. This issue is due to errors in creating bootable media. The reason may be user inattention. Some drives do not read all discs, especially older models. Also, the computer can independently protect the system from pirated copies, so during . If you still have problems, it is better to contact the service center.
Hello, site administrator remontcompa.ru, I have a question for you - how to install Windows 7 on a new computer, that is, on a blank hard drive without partitions? Surely there are some rules and if you don’t follow them, problems will definitely arise that you want to avoid. Georgy.
Installing Windows 7
Hello friends! Installing Windows 7 on your desktop computer or laptop from a disk, as well as from a flash drive, should not be accompanied by any difficulties after reading our article. We have prepared for you a detailed description of each step and included many illustrations. Having gone through all the installation steps with us, next time you will install Windows 7 without any outside help.
- Firstly, the official Windows 7 64-bit distribution can be downloaded from the official.
- Secondly, if you have UEFI BIOS and you want to install Windows 7 on a GPT disk, but don’t know how to do it, read our article.
- Thirdly, if you bought a new laptop with Windows 8.1 and want to install Windows 7 instead, then all the manipulations with the UEFI BIOS and the process of further system installation.
- Fourthly, if you have problems installing Windows 7, refer to our article -.
- Fifthly, if you don't have a disk drive, you can use our instructions and.
- Sixth, if you are installing Windows 7 from a flash drive, then be aware that Windows 7 does not support USB 3.0 (ports are usually colored blue), if your flash drive is USB 3.0, insert it into a USB 2.0 port.
So, final preparations before installing the operating system. What should you do first?
If you are installing Windows 7 on a hard drive with existing partitions, then you need to copy all your data from the partition on which you will install Windows 7. During the installation process, this partition will be formatted and information from it will be deleted.
If you are installing Windows 7 on a blank hard drive, then you don’t need to do anything, just read the article further.
In general, there is nothing complicated in all this, at the very beginning of the boot we press on the keyboard, in most cases these are the F2 or Delete keys, we entered the BIOS, here we need the “Boot Sequence” or “Boot” section. There are basically two types of BIOS, this window is Ami BIOS, we will look at setting it up in our article, if the window has a different interface, then you have Award BIOS, how to work in it is written in our article “BIOS booting from disk ".
As we can see, the first boot device is the hard drive - HDD: PM-MAXTOR STM3, use the arrows to highlight the first item 1st Boot Devise and press Enter.

In this menu, we will set the CD-ROM as the first boot device (First Boot Device), select it using the arrows on the keyboard, then Enter.

So the first disk drive, and the second one turned out to be a hard drive, that’s what you need.

Save the settings (press F10) and reboot.
If you have correctly set the BIOS to boot from the drive and you have an installation disk with Windows 7 in it, then the next time you boot the computer you will see a prompt on the monitor to boot from the Windows 7 installation disk - Press any key to boot from CD or DVD. We press any key on the keyboard, keep in mind that if you do not have time to press within a few seconds, the system will reboot and everything will start from the beginning.

The installation process of the operating system begins, wait patiently

Here you need to select the system language.

Install

We accept the terms of the agreement

Selecting the full installation

In this window we see the space of my 500 GB hard drive ( Disk 0) divided into two sections (Section 1 and Section 2). The Windows 7 operating system is already installed on the hard drive; I personally don’t need it and I want to reinstall it. Before installation, I will delete all existing partitions on the hard drive and create them again. In general, there is a rule that if you want to avoid errors when installing Windows 7, it is better to delete all existing partitions before installation and create them again or install the operating system directly into unallocated space.
Select with the left mouse Disk 0 Partition 2 and press the button Delete.


Select with the left mouse Disk 0 Partition 1 and press the button Delete .


Old sections have been deleted, we are creating new ones.
Select with the left mouse Unallocated disk space 0 and press Create.

In this window, you need to select the size of our future disk (C:), Windows 7 will be installed on it. Let’s choose a size of 200 GB, I think this will be quite enough. Click Apply.

For Windows 7 to work correctly, you need to create a hidden partition of 100 MB with download files.
Therefore, when asked “To ensure that all of its features work correctly, Windows may create additional partitions for system files,” click OK.

On Disk 0 we now have a hidden partition Section 1: System Reserved(volume 100 megabytes) with Win 7 download files.
A second Partition 2 has also appeared, it will be the system drive (C:), its volume is 196.1 GB.
We convert the unoccupied space into a partition. Select it with the left mouse and click Create, this will be our drive (D:).

Apply

We will install Windows 7 on Disk 0 Partition 2: (future drive C:), select it with the left mouse and click Next.

The Windows 7 installation process begins.
If you have reached this page, it means you have decided to reinstall Windows 7 and need help with the installation. Below I will tell you in detail all the stages, starting with loading Windows on your computer and ending with Activating Windows and a short introductory video. And so let's get started. The first thing you need to do is download the Windows 7 image itself; there are two types: 32x and 64x. How to understand what bit depth you need, very simply in the computer properties there is information about your hardware, we are interested in the RAM line (installed memory). If you have 4 GB or more installed, you need a 64-bit version, everything below is 32-bit.
When we have already decided on the bit depth, we proceed to download the Windows 7 image. Click on the green button “Download Windows 7 Ultimate” and a torrent file called ru_windows_7_ultimate_with_sp1_x86.iso.torrent will be downloaded to your computer. We launch it to proceed to downloading via torrent program. If the file asks you to open it through any program, then uTorrent is not installed. follow the link to download it.
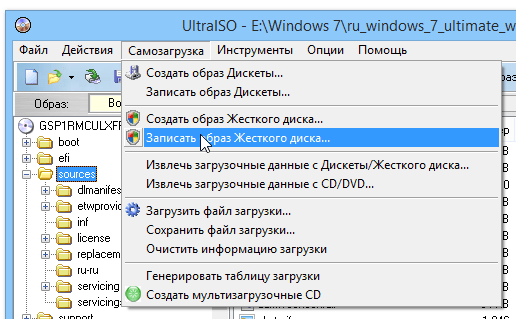
While Windows is in the process of downloading, we will download and install the UltraISO program. Using it, we will write the image to a disk or flash drive.

After installing UltraISO and loading Windows, let's start recording to a disk or flash drive. Launch UltraISO and perform the actions as in the screenshot:

Open the image with the program and perform recording.


We wait for the process to complete and close the program window. Now your flash drive or disk is ready to start outside the system.
Well, now the most interesting thing is, we need to tell the computer to start from our media; for this we need to call the BOOT MENU. Usually these are the DEL or F8 keys, but there are exceptions, it all depends on the manufacturer of your motherboard - below are the buttons from which you can call the BUTMENU from various motherboards.

If you did everything correctly, you will see a type of menu with a boot selection, control using the arrows and the ENTER key.

After selecting the BOOTMENU, it will begin copying the “loading in Windows file” files to start installing Windows 7. In the first installation window, you must select a language and click Next.

In the next window, click Install.

Selecting the installation type, click “Full installation (advanced options)

And here is the most important window, selecting the partition on which the installation will be performed. For proper installation, you must format the system drive C where your old Windows is located. Ideally, it is better to delete it and also the partition where the MBR is stored; it usually weighs 100 MB. To do this, select the section and click Delete. “Unallocated disk space” will appear. Click “Create”, specify the disk size or leave it unchanged and click “Apply”

Now it’s a matter of time, as soon as you click Next, copying files to install Windows 7 will begin. You can remove the flash drive or disk after the first reboot and watch the installation process until the Select user name window appears. Enter any desired name and click Next.

In the Windows product key entry window, uncheck the “Automatically activate Windows when you connect to the Internet” checkbox and click Next.

That’s the whole simple installation process, a familiar desktop will appear in front of you - which means that Windows 7 Ultimate is installed.
Another important and mandatory process is Windows activation. On the desktop, find a shortcut called “Activator”, launch it and do everything as shown below in the screenshots.
When buying a brand new laptop, few people pay attention to the fact that modern models often do without a drive. It would seem, what's wrong with that? True, once it comes to installing/reinstalling Windows, the question begins to sound different. Why don’t you run out in the middle of the night for a new drive just to use a pre-purchased licensed disc with Windows 7?! But it would also be stupid to refuse to buy a powerful laptop because of this trifle! Really! In this case, it’s easier to figure out how to install/reinstall Windows 7 on a PC without an installation disk.
Let’s say right away that you can cope with this task in different ways. In particular, it is possible to reinstall Windows on a computer:
- through the System Restore utility;
- using the Recovery utility built into the laptop (if it was originally on the computer);
- by installing Windows from a bootable USB flash drive.
Moreover, each method of reinstalling Windows 7 on a computer requires its own instructions, which, however, is not a problem at all if you find yourself on this page. Well let's go!
Method number 1: System rollback
If Windows 7 not only boots, but also responds normally to commands after a restart, you can try to reinstall it using a standard Windows rollback to the previous (working) state. How do we act? First, open the “Start” menu, go to “Control Panel”, and from there to the “Recovery” section:

Then in the window that appears, click the “Start recovery...” button to launch the Windows Recovery Wizard and click “Next”. After that, select the appropriate date option for reinstalling Windows 7 and click “Finish”, proceeding to this step using the “Next” button:

As a result of such simple manipulations, the system will be automatically updated without an installation disk, without affecting documents, media and other files valuable to users stored on the computer.
Method No. 2: Reinstalling the system using the Recovery program
For those who are looking for a hint on the question of how to reinstall Windows without a disk if the system also does not boot, the long-awaited answer will be the Recovery utility built into the laptop software. It is presented on almost all modern laptops, although under different names. For example, Toshiba laptops have Recovery Wizard installed, Samsung laptops have Recovery Solution, Hewlett Packard laptops have HP Recovery Manager. However, regardless of the name, their purpose is the same - to help reinstall Windows without a disk, returning it to factory settings.
True, you can run Recovery only on a laptop with an unformatted working hard drive that previously had . To start it, in particular, you will need to reboot the system and, when starting Windows, press the corresponding hotkey several times:

Further instructions will be determined by prompts from the utility itself. For example, on Samsung, the action plan will look like this:

Method No. 3: Installing the system from a bootable USB flash drive
If OS Windows 7 cannot be installed/reinstalled on a computer without a disk using any of the above methods (the PC does not boot, problems with the hard drive, etc.), you can use a special bootable flash drive to reinstall the operating system. In this case, the instructions look a little more complicated. In particular, during the Windows installation process you will need:
- prepare the hard drive for formatting;
- download iso image;
- write drivers and distribution to a flash drive;
- configure the system to start from USB;
- install (reinstall) Windows 7 on your computer;
Ready? Then let's get started!
Step #1: Prepare your PC
Based on the fact that as a result of reinstalling Windows 7 on a computer, all data stored on the hard drive will be destroyed, before installing (reinstalling) the system, it is worth transferring important information in advance to a more reliable place, for example, to an external drive.
At this same stage, you should also worry about the drivers for the laptop. You can download them absolutely free from the official website of the PC manufacturer, so no problems should arise. Moreover, before reinstalling Windows, do not forget to make sure that the drivers were not stored on the hard drive, but were successfully transferred to the flash drive.
At the same time, you need to download an iso image of Windows 7 to your computer, paying attention to its release. It must correspond to the one recorded on the purchased licensed disk with Windows, otherwise it will not be possible to activate it with the purchased key.
Step No. 2: Burn a flash drive
You can prepare a bootable USB flash drive in different ways (details and ), but it’s easier to write it through the Rufus utility. Working with it is quite simple, you just need to connect the flash drive to the laptop and launch the program. All that is needed next is:

Step #3: Setting up system startup
You can either set the appropriate parameters in the BIOS, or by pressing special hot keys at startup. The last option seems to be the simplest. The only thing we need to do is press the desired button simultaneously with booting the system and set the boot option from a USB drive in the context menu that appears. For example.